
I like my patterns to be inclusive, so I try to offer them with both written and charted instructions. However, sometimes (like the Mahy shawl) a chart is the best way of offering concise and precise information. I know many people don’t like charts, but I hope this series of tutorials will go some way to demystify charts and explain how to use them. This post is about how to read a basic chart. The chart is very straightforward - no shaping and no extra stitches being added. If you like this stitch pattern, you may enjoy my Florence scarf (it's free and only takes one ball of fluffy yarn).
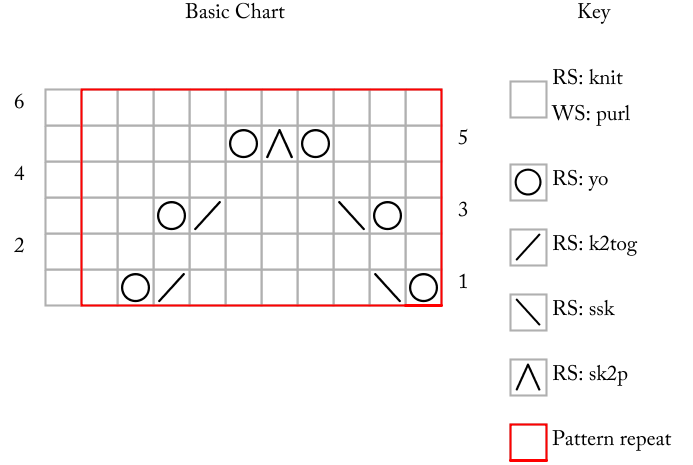
Reading a chart can be really daunting. Unfortunately chart symbols are not standardised and so you need a key which explains what the various symbols mean. Always check the key to make sure you know what the symbols mean.
Tip: If you find it hard to remember what the various symbols mean, or if you keep mixing up two symbols, make a copy of the chart and assign a colour to each symbol. Grab highlighter pens and start colouring in the chart. It's a nice little brain-hack.
Now let's look at the chart itself.
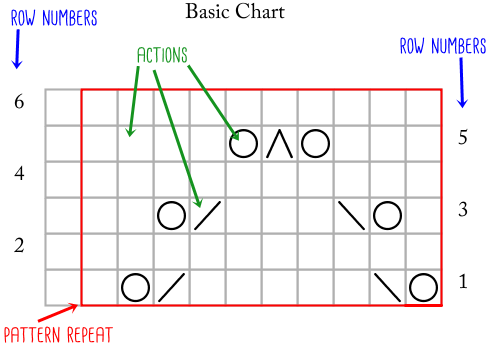
Row numbers are important because they tell you which is the RS and the WS rows. RS rows have numbers on the right-hand side. WS rows have numbers on the left-hand side. We'll come back to why this is important in just a second!
Pattern repeats are outlined. Normally the outline is red, but you may come across a fat, black line being used if the pattern is provided in black & white. The outline is exactly the same as the repeat from *.. you are used to from written instructions. In this case, you can see this is a 10-stitch/6-row repeat. You repeat the ten stitches over and over, until you finish with one stitch (the one outside the repeat).
Action is how I think of a square in a lace chart. Each square represents an action you must take when you get to that stage. Many people think that each square represents a stitch, but sometimes you work more than one stitch per square or do not work a stitch at all. A right-slating line means you are knitting two stitches together; a V (not represented) typically means you are slipping a stitch from one needle to another.
When you work a lace chart, you move from one action to another. One of the biggest advantages of a chart is that it shows you how actions stack on top of one another, creating a stitch pattern. The visual mimicry of the chart symbols often mean your fabric will resemble the chart!
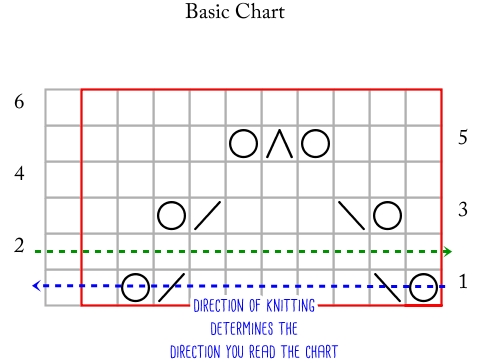
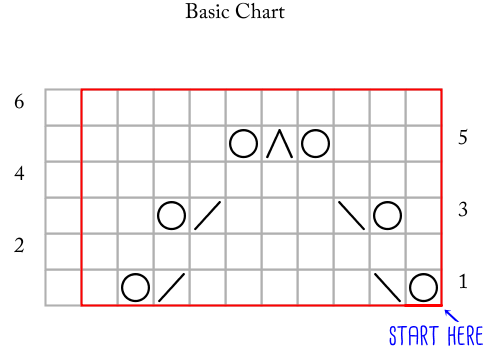
The two biggest problems of reading a lace chart is A) where to start and B) how to know which direction you read the actions. Many people think you start by reading a chart like you'd read a piece of English-languaged text: top left and reading left to right. This is incorrect. And this is where we go back to talking about row numbers because row numbers are your friends.
A chart mimics the knitted fabric and your first row will therefore always be at the very bottom. The row number shows that you start at the right-hand side and work your way left. This corresponds with how you work the stitches too: you move your stitches from the left-hand needle to the right-hand needle. When you work the WS rows, you will have turned your work, so you need to turn/revert the direction in which you are reading the actions. Again, the row numbers are your anchors as they will show you where the given row starts!
So in short:
This post is part of my Lace Chart tutorials.
Lace Charts 1 - The Anatomy of a Lace Chart. Lace Charts 2 - How to Read a Basic Chart Lace Charts 3 - How to Read a Shawl Chart Lace Charts 4: Chart Tricks & Knitting Hacks
Hope you found this useful! Next time we'll be looking at how to deal with 'no stitches', shaping, and how to customise your lace chart reading. As always, comments and questions are welcome! Kx